
Battlerite was supposed to be the game that proved arena brawlers could work. Stunlock Studios took everything they learned from Bloodline Champions — the skillshot-everything combat, the counter mind-games, the orb control — and rebuilt it with modern graphics, smoother controls, and a free-to-play model designed to attract a wider audience.
For a while, it worked. Battlerite peaked at over 44,000 concurrent players during its free-to-play launch in November 2017. The combat was exceptional. The champion designs were creative. The competitive scene was growing. And then it all fell apart — a story told in detail in Why Battlerite Failed and What Comes Next.
This guide isn’t about why Battlerite failed. It’s about what made it great. What follows is a comprehensive reference for every champion, every core mechanic, and the systems that made Battlerite the best arena brawler since BLC. With the game no longer playable, this is the record.
For the complete BLC reference that started it all, see The Complete Bloodline Champions Guide.
How Battlerite Worked
Battlerite refined BLC’s formula while keeping the core philosophy: skillshot-everything, small teams, short rounds, high skill ceiling.
The Ability System
Key Concept: The 9-ability kit — 7 base abilities plus 2 energy-powered EX upgrades — was the foundation of the entire arena brawler genre. Every button mattered. Every ability was a skillshot. No auto-targeting, no lock-on, no filler. This is the template every game in the genre still builds from.
Every champion had 7 base abilities plus 2 EX abilities, mapped to the same control scheme BLC established:
| Key | Slot | Role |
|---|---|---|
| M1 | Primary Attack | Low cooldown main damage. Ranged projectiles or melee combos. |
| M2 | Secondary | Healers: primary heal. DPS: powerful secondary attack or utility. |
| Space | Escape/Mobility | Dash, teleport, leap, or movement buff. Primary survival tool. |
| Q | Defensive/Utility | Counter (trance), shield, or defensive tool for most champions. |
| E | Ability | Crowd control, damage, or utility — varies by champion. |
| R | Ability | Often a strong offensive or defensive tool on a longer cooldown. |
| F | Ultimate | Costs full energy. Powerful finisher or game-changing ability. |
| EX1 | Enhanced M1/M2 | Upgraded version of a base ability. Costs 1 energy bar (25 energy). |
| EX2 | Enhanced ability | Upgraded version of another base ability. Costs 1 energy bar. |
Every ability was a skillshot. Heals, projectiles, dashes — all manually aimed. This was the genre’s defining design choice, carried over from BLC.
The Battlerite System
Key Concept: Round-by-round talent selection was Battlerite’s most original contribution to competitive PVP. No other game let you adapt your build mid-match based on what you were facing. It turned every round into a strategic decision on top of the mechanical one.
This was Battlerite’s signature innovation over BLC. Before each round, every player chose one of three Battlerites — passive upgrades that modified their abilities. Battlerites were organized into 5 rounds of choices, selected progressively as rounds advanced:
- Round 1: Choose from 3 Battlerites
- Round 2: Choose from 3 different Battlerites
- Rounds 3-5: Additional choices from the remaining pool
This system replaced BLC’s Traits and Medallions with something more elegant. Instead of account-level stat advantages, every player started equal and customized their kit through round-by-round choices. The same champion could play differently depending on which Battlerites were selected — a burst-focused Ashka versus a zone-control Ashka, for example.
Battlerites added meaningful build diversity without the baggage of pre-game loadouts. You could adapt your build to the enemy composition in real time.
Energy System
Energy was built through combat — landing abilities, taking damage, and controlling the center orb. Energy was divided into 4 bars of 25 energy each (100 total):
- EX abilities cost 1 bar (25 energy)
- Ultimate (F) cost 4 bars (100 energy)
The strategic tension was the same as BLC: spend energy on powerful EX abilities now, or save for your ultimate. Battlerite’s 4-bar system made the decision more granular — you could spend 1, 2, or 3 bars on EX abilities and still have partial progress toward your ultimate.
Recovery Health (Green Health)
Battlerite kept BLC’s recovery health system with a visual upgrade. When healed, champions gained green health — visually distinct from white permanent health. Green health functioned identically in combat but couldn’t exceed a cap (roughly 40% of max HP, varying by champion).
The center orb was the only way to restore permanent health, making orb control the most important objective in every round.
Center Orb
A neutral orb spawned at the center of every arena. Destroying it granted the killing team health (both real and recovery) and energy. The orb had a health bar and spawned on a timer, creating natural fight rhythms.
Orb control was the backbone of competitive Battlerite strategy. Teams positioned for orb spawns, planned ability cooldowns around orb timing, and used orb pressure to force engagements.
Counter (Trance) System
Key Concept: The counter is the soul of arena brawler combat. Attack into it and get punished. Don’t attack and give the enemy free time. Bait it and punish the cooldown. This single mechanic created more depth than entire ability kits in other genres. Every fight at high level was a counter mind-game first and a damage race second.
Most champions had a counter ability (usually Q) — a brief defensive stance that, if triggered by an enemy attack, punished the attacker with a stun, damage, or other effect. Counters lasted roughly 1 second and had moderate cooldowns.
The counter mind-game was identical to BLC’s trance system and the deepest skill-expression layer in Battlerite. Attacking into a counter was punished. Not attacking gave the enemy free time. The correct play was to bait the counter and punish the cooldown window. At high levels, counter-baiting was an art form.
Death Vortex
When the round timer expired, a Death Vortex closed in from the arena edges, dealing damage to anyone caught in it. This replaced BLC’s fog and served the same purpose — preventing stalling and forcing close-quarters combat.
Crowd Control and Diminishing Returns
Battlerite implemented diminishing returns on crowd control — successive CC effects on the same target had reduced duration. This prevented chain-CC strategies and ensured fights were decided by sustained play, not by who landed the first stun.
The Champions: Melee
Key Concept: Battlerite launched with 20 champions and grew to 27 before Stunlock Studios ended development. Every single one had a distinct mechanical identity. What follows is the complete record of all 27 — their abilities, their playstyles, and the BLC bloodlines they descended from. This is the roster that proved arena brawlers could produce character design on par with any genre.
Melee champions fought at close range with gap-closers, burst damage, and strong defensive tools. They needed to get in, deal damage, and get out — or commit and trust their kit to sustain them.

 Bakko
Bakko
Role: Melee | Health: 230 | Theme: Warrior with axe and shield
Core mechanic: Bakko’s Bulwark (Q) was a directional shield that reflected projectiles and blocked melee — one of the most powerful defensive tools in the game. War Axe (M2) dealt devastating damage that scaled with distance.
| Ability | Key | Description |
|---|---|---|
 War Axe War Axe | M1 | Melee combo, 8/8/12 damage (3 hits). Third hit applies a brief slow. |
 Blood Axe Blood Axe | M2 | Thrown axe, 18-38 damage scaling with distance + self-heal. Longer range = more reward. |
 Valiant Leap Valiant Leap | Space | Leap to target area, dealing 12 damage + knockback on landing. |
 Bulwark Bulwark | Q | Directional shield reflecting projectiles and blocking melee (1.5s). Successful block triggers a stun on the attacker. |
 War Stomp War Stomp | E | AoE around Bakko, dealing 14 damage + knockback + brief incapacitate. |
 Shield Dash Shield Dash | R | Short dash while blocking, ending with a bash that deals 10 damage + stun. |
 Heroic Charge Heroic Charge | F | Long-range dash dealing 40 damage + wall stun (1s). Devastating in enclosed arenas. |
| EX M2 | EX1 | Enhanced Blood Axe — heals more, applies Fading Snare. |
| EX Space | EX2 | Enhanced Valiant Leap — stuns targets instead of knocking back. |
Playstyle: Bakko was the balanced melee — good at everything, exceptional at nothing except Bulwark. The directional shield reflecting projectiles made him the bane of ranged champions who relied on poke. Blood Axe’s distance scaling rewarded patience — throw it from max range for maximum damage and healing.
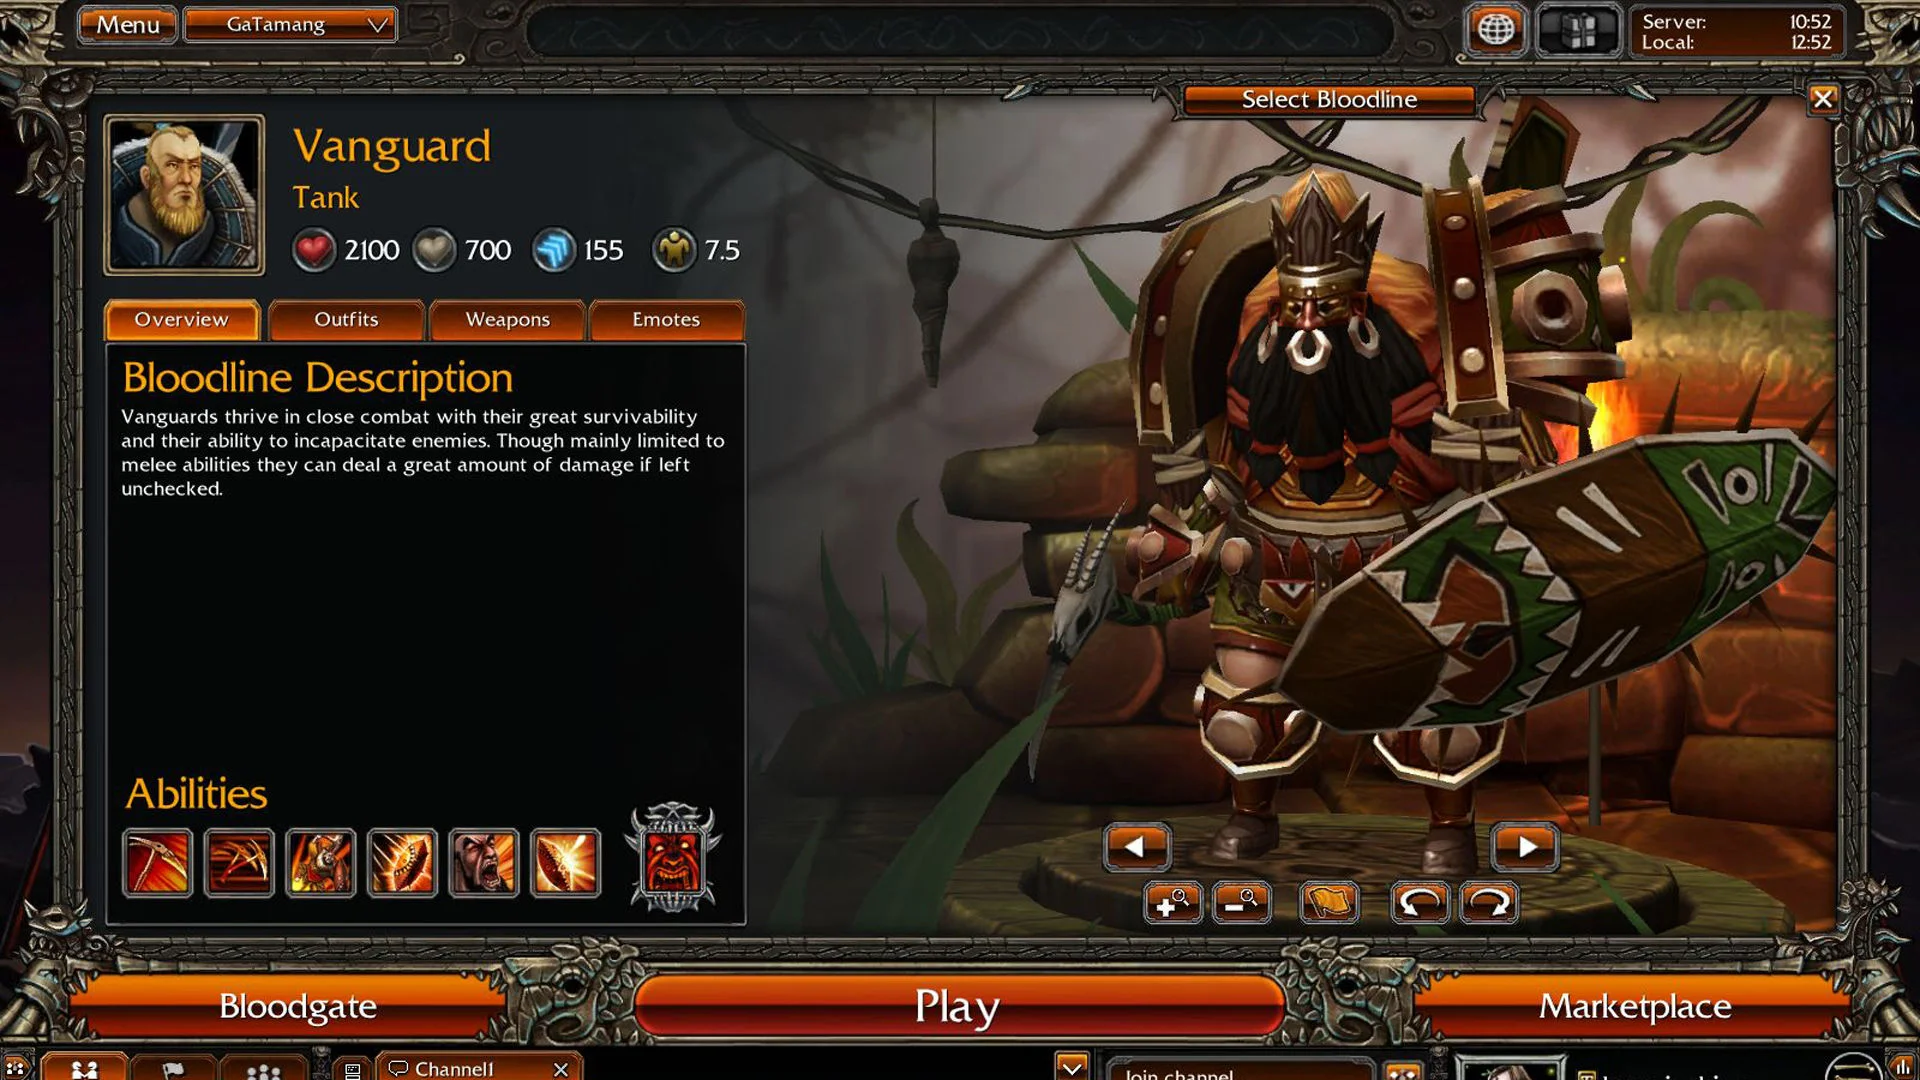
BLC equivalent: Vanguard — the holy warrior tank with shield and projectile reflection.
 Croak
Croak
Role: Melee | Health: 200 | Theme: Frog assassin with dual blades
Core mechanic: Stealth (Q) into empowered M1 for burst damage. Constant in-and-out gameplay with multiple escape tools.
| Ability | Key | Description |
|---|---|---|
 Blade Flurry Blade Flurry | M1 | Three melee strikes, 6/6/10 damage. Third hit applies Toxin (DOT). |
 Toxin Muck Toxin Muck | M2 | Spit poison puddle dealing damage over time to enemies standing in it. |
 Frog Leap Frog Leap | Space | Double jump — two charges. Second jump can be used within a short window. |
 Camouflage Camouflage | Q | Stealth for 2.5s. Next M1 from stealth stuns the target briefly. |
 Spit Spit | E | Projectile dealing damage + Stun. Short range but fast. |
 Deceit Deceit | R | Dash that leaves a clone. Clone taunts nearby enemies briefly. |
 Venom Wind Venom Wind | F | Dashes forward hitting all enemies in path for 50 damage + applying Toxin. |
| EX M2 | EX1 | Enhanced Toxin Muck — larger area + healing reduction debuff. |
| EX Q | EX2 | Enhanced Camouflage — grants movespeed + heals on stealth. |
Playstyle: Croak was the quintessential assassin. Frog Leap (two charges!) gave exceptional mobility. The core loop: Camouflage → M1 from stealth (stun) → M1 combo → Frog Leap out. Croak punished overextended healers and squishy ranged champions. The double jump made him one of the slipperiest champions to pin down.
BLC equivalent: Direct descendant of Ranid Assassin — same frog, same stealth, same hit-and-run design.
 Freya
Freya
Role: Melee | Health: 225 | Theme: Norse warrior with hammer and shield
Core mechanic: Static (from abilities) consumed by M1 for bonus damage. Thunderclap (Q) was a powerful counter that struck back with lightning.
| Ability | Key | Description |
|---|---|---|
 Charged Strike Charged Strike | M1 | Melee combo, 10/10 damage. Consumes Static on target for bonus damage + brief stun. |
 Hammer Throw Hammer Throw | M2 | Throws hammer dealing 14 damage + applying Static. Returns to Freya. |
 Spring Spring | Space | Leap applying Static to enemies near landing + knockback. |
 Thunderclap Thunderclap | Q | Counter — negates next attack, retaliates with AoE lightning dealing 12 damage + Stun. |
 Storm Mace Storm Mace | E | Dash forward striking enemies for 16 damage + Incapacitate. |
 Electric Shield Electric Shield | R | Applies shield to self that absorbs damage and deals AoE on expiry or break. |
 Valkyrie’s Descent Valkyrie’s Descent | F | Leaps to target area, dealing 40 AoE damage + Incapacitate on landing. |
| EX M2 | EX1 | Enhanced Hammer Throw — pulls enemies toward Freya on return. |
| EX E | EX2 | Enhanced Storm Mace — longer dash + additional knockback. |
Playstyle: Freya excelled at diving and disrupting. Static application from M2 and Space set up empowered M1s for burst. Thunderclap was one of the best counters in the game — an AoE stun that punished anyone attacking into it. Freya was weaker against kiting but devastating when she could stick to a target.
 Jamila
Role: Melee | Health: 200 | Theme: Assassin with hookblades
Core mechanic: Phantom Cut (Q) — a counter that struck through enemies, and Shadow Charge (R) — a powerful dash that could wall-stun. Chain combos between abilities.
| Ability | Key | Description |
|---|---|---|
| Deadly Strike | M1 | Three-hit melee combo with increasing damage. Third hit heals Jamila. |
| Shadow Shuriken | M2 | Thrown shuriken dealing damage + applying Shadowbite (amplifies next ability damage). |
| Elusive Strike | Space | Dash through enemies dealing damage. Resets on kill. |
| Phantom Cut | Q | Counter — negates next attack, retaliates with a dash-through strike. |
| Hook Slash | E | Two-stage: hook forward to pull self to target, then slash for damage. |
| Shadow Charge | R | Dash that knocks enemies back. Wall stun if enemy hits a wall. |
| Deadly Assault | F | Multi-hit melee barrage dealing high sustained damage to nearby enemies. |
| EX M2 | EX1 | Enhanced shuriken — applies stronger debuff. |
| EX Space | EX2 | Enhanced Elusive Strike — deals more damage + heals. |
Playstyle: Jamila was the combo assassin. Her kit chained together fluidly — Hook Slash into target, M1 combo, Shadow Charge to knock them into a wall for stun, follow up with more M1. The Elusive Strike reset on kill made her terrifying in teamfights where she could chain resets through dying targets.
 Raigon
Role: Melee | Health: 230 | Theme: Sword-wielding prince
Core mechanic: Parry (Q) was a counter that struck back and healed. Dragon Palm (E) was a powerful palm strike that knocked enemies back. Simple but effective kit.
| Ability | Key | Description |
|---|---|---|
 Sword Strike Sword Strike | M1 | Two-hit melee combo, 8/12 damage. Simple and reliable. |
 Heavenly Strike Heavenly Strike | M2 | Charged overhead slash dealing 24 damage. Applies Slow. |
 Seismic Shock Seismic Shock | Space | Dash forward dealing 14 damage + Incapacitate on landing. |
 Parry Parry | Q | Counter — absorbs next attack, retaliates with sword strike dealing 10 damage + self-heal. |
 Dragon Palm Dragon Palm | E | Palm strike dealing 16 damage + knockback. Powerful peel and chase tool. |
 Retribution Retribution | R | AoE spin dealing damage over time to nearby enemies + self-healing. |
 Wrath of the Tiger Wrath of the Tiger | F | Slashes forward dealing 50 damage to first target hit + large knockback. |
| EX Space | EX1 | Enhanced Seismic Shock — longer range + stun instead of incap. |
| EX E | EX2 | Enhanced Dragon Palm — deals more damage + applies Slow. |
Playstyle: Raigon was the beginner-friendly melee champion. Every ability was straightforward, and Parry gave a reliable defensive tool. Dragon Palm into wall → M1 combo was the bread-and-butter play. Retribution (R) spinning for AoE damage and self-healing in the middle of a fight gave Raigon surprising sustain. His simplicity was his strength — no complex setups, just solid fundamentals.
 Rook
Rook
Role: Melee | Health: 250 | Theme: Hulking berserker
Core mechanic: Rush (Space) charged forward for massive damage + Frenzy buff (attack speed). Meat Bolt (Q) was a counter that stunned. Berserk (R) was a powerful self-buff.
| Ability | Key | Description |
|---|---|---|
 Crushing Blow Crushing Blow | M1 | Heavy melee strikes, 10/10/16 damage. Third hit knocks back. |
 Boulder Toss Boulder Toss | M2 | Throws a boulder dealing 16 damage + Stun. Short range, slow projectile. |
 Rush Rush | Space | Charges forward, first enemy hit takes 18 damage + Frenzy (attack speed buff on Rook). |
 Meat Bolt Meat Bolt | Q | Counter — absorbs next attack, retaliates with bolt dealing 10 damage + Stun. |
 Smack Smack | E | Cone melee attack dealing 14 damage + pulls enemies slightly toward Rook. Self-heals. |
 Berserk Berserk | R | Self-buff: increased damage + movement speed for a duration. |
 Eat Eat | F | Grabs and devours an enemy, dealing 50 damage + healing Rook. |
| EX M1 | EX1 | Enhanced Crushing Blow — bonus damage + longer knockback on third hit. |
| EX Space | EX2 | Enhanced Rush — deals more damage + applies Armor Break. |
Playstyle: Rook was the pure brawler. Rush in, activate Berserk, start swinging. His HP pool was the highest in the game among melees, and Smack’s self-healing kept him in fights. Rook was terrifying at low HP — Eat (ultimate) was one of the most satisfying finishers, literally eating an enemy for massive damage and healing. The weakness was mobility — Rook had Rush and nothing else for gap-closing.
BLC equivalent: Glutton — same earth brawler identity, same self-sustaining melee design.
 Ruh Kaan
Role: Melee | Health: 230 | Theme: Dark reaper with scythe
Core mechanic: Curse (from abilities) consumed by M1 for bonus damage + self-healing. Shadow Bolt (M2) was a ranged pull that brought enemies to Ruh Kaan.
| Ability | Key | Description |
|---|---|---|
 Defiled Blade Defiled Blade | M1 | Scythe strikes, 8/8/14 damage. Consumes Curse for bonus damage + lifesteal. |
 Shadow Bolt Shadow Bolt | M2 | Ranged projectile dealing 8 damage + pulling enemy toward Ruh Kaan + applying Curse. |
 Sinister Strike Sinister Strike | Space | Dash dealing 12 damage + applying Curse. |
 Consume Consume | Q | Counter — absorbs next attack, heals Ruh Kaan + applies Silence to attacker. |
 Claw of the Wicked Claw of the Wicked | E | Projectile dealing 14 damage + Silence. Long range, moderate cooldown. |
 Shadowbolt Shadowbolt | R | Charged shadow projectile dealing high damage + knockback. |
 Reaping Scythe Reaping Scythe | F | Dashes forward dealing 60 damage to all enemies in path + applying Curse. |
| EX M2 | EX1 | Enhanced Shadow Bolt — heals more + stronger pull. |
| EX E | EX2 | Enhanced Claw — root instead of silence. |
Playstyle: Ruh Kaan was the melee-ranged hybrid. Shadow Bolt (M2) pulling enemies in was his initiation — land it, curse the target, then M1 for empowered lifesteal damage. Consume (counter) into Silence was brutal against abilities being channeled. Ruh Kaan thrived in extended fights where Curse + lifesteal let him outlast opponents. Weak to kiting, but once he got in, he was hard to shake off.
BLC equivalent: Harbinger — same dark melee lifesteal mage identity, same pull mechanic.
 Shifu
Shifu
Role: Melee | Health: 210 | Theme: Spear master with martial arts
Core mechanic: Kunju (Q) — a counter that teleported behind the attacker. Javelin (M2) was a thrown spear that immobilized. In-and-out burst pattern.
| Ability | Key | Description |
|---|---|---|
 Spear Strike Spear Strike | M1 | Spear combo, 6/6/6/10 damage. Fast attack speed. |
 Javelin Javelin | M2 | Thrown spear dealing 18 damage + Root (immobilize). Pulls Shifu to target. |
 Fleetfoot Fleetfoot | Space | Dash granting brief immaterial + movement speed. Can attack during. |
 Kunju Kunju | Q | Counter — negates next attack, teleports behind attacker + deals 10 damage + Slow. |
 Tendon Swing Tendon Swing | E | Whirlwind attack hitting all nearby enemies for 12 damage + Incapacitate. |
 Impale Impale | R | Thrusts spear forward dealing 16 damage + Stun on wall pin. |
 Tempest Rush Tempest Rush | F | Multi-hit dash dealing 50+ damage to targets in path + knockback. |
| EX M2 | EX1 | Enhanced Javelin — pulls enemy to Shifu instead. |
| EX Space | EX2 | Enhanced Fleetfoot — longer duration + damage on contact with enemies. |
Playstyle: Shifu was the hardest counter to ranged champions. Javelin closed the gap + immobilized, M1 spam delivered fast damage, and Kunju punished anyone who tried to fight back. Fleetfoot provided the escape when things went wrong. Shifu’s speed and burst made him the premier assassin-fighter — weaker in sustained brawls but devastating in short engagements.
BLC equivalent: Spear Master — nearly identical kit and playstyle.
 Thorn
Thorn
Role: Melee | Health: 240 | Theme: Living tree with nature magic
Core mechanic: Barbed Husk (Q) — a massive self-shield that could be detonated for AoE damage. Root mechanics that controlled enemy movement.
| Ability | Key | Description |
|---|---|---|
 Lashing Roots Lashing Roots | M1 | Whip-like root attacks, 6/6/14 damage. Moderate range for melee. |
 Burrow Burrow | M2 | Burrows underground, becoming untargetable. Emerges at cursor dealing damage + Root. |
 Evil Clutch Evil Clutch | Space | Pulls self to target location dealing 8 damage + Slow to enemies in path. |
 Barbed Husk Barbed Husk | Q | Massive self-shield (absorbs 40+ damage). Can be reactivated to detonate for AoE damage. |
 Entangling Roots Entangling Roots | E | Ground AoE that roots enemies for 1.5s. |
 Whiplash Whiplash | R | Throws out a vine that grabs enemy and pulls them toward Thorn. |
 Deadwood Totem Deadwood Totem | F | Places a totem that periodically deals AoE damage and slows enemies. |
| EX M2 | EX1 | Enhanced Burrow — heals Thorn when emerging. |
| EX E | EX2 | Enhanced Entangling Roots — longer root + damage over time. |
Playstyle: Thorn was the disruptor tank. Barbed Husk absorbed massive damage and then exploded back in the enemy’s face. Entangling Roots and Whiplash controlled enemy positioning constantly. Burrow was unique — going underground to reposition while untargetable. Thorn was the hardest melee champion to kill and excelled at creating chaos in teamfights.
BLC equivalent: Thorn (same name!) — BLC’s plant-based burrowing tank.
The Champions: Ranged
Ranged champions dealt damage from distance, controlled zones, and relied on mobility to survive when dived. They were the primary damage dealers in most team compositions.
 Ashka
Ashka
Role: Ranged | Health: 200 | Theme: Fire mage — Battlerite’s mascot
Core mechanic: Ignite DOT applied by multiple abilities, maintained by M1. Pure burst damage with strong escape tools.
| Ability | Key | Description |
|---|---|---|
 Fireball Fireball | M1 | Fire projectile dealing 16 damage. Refreshes Ignite duration on targets. |
 Fire Storm Fire Storm | M2 | Channeled — fires 3 fireballs in rapid succession (14 damage each) + knockback. |
 Searing Flight Searing Flight | Space | Dashes in target direction, dealing 12 AoE damage at origin and destination. |
 Flamestrike Flamestrike | Q | Counter — negates next attack, retaliates with fire burst dealing 12 damage + Stun. |
 Molten Fist Molten Fist | E | Projectile dealing 14 damage + Stun + knockback. Long range. |
 Fire Wall Fire Wall | R | Places a wall of fire that deals damage and slows enemies passing through. |
 Lava Punch Lava Punch | F | Dashes forward dealing 40 damage + massive knockback to first enemy hit. |
| EX M2 | EX1 | Enhanced Fire Storm — faster cast + applies Ignite. |
| EX Space | EX2 | Enhanced Searing Flight — longer range + leaves fire trail. |
Playstyle: Ashka was pure offense. The highest consistent damage output among ranged champions, with Fireball refreshing Ignite for sustained DOT pressure. Fire Storm burst was devastating when enemies couldn’t dodge the triple fireball. Searing Flight was a solid escape, and Flamestrike counter added a defensive tool that most glass cannons lacked. Ashka was the go-to for learning ranged play.
BLC equivalent: Direct descendant of Igniter — BLC’s mascot fire mage.
 Destiny
Role: Ranged | Health: 210 | Theme: Power-armored gunslinger
Core mechanic: Charged Shot (M2) — a channeled high-damage blast. Magnetic Orb (Space) was both an escape and a utility tool.
| Ability | Key | Description |
|---|---|---|
 Power Blaster Power Blaster | M1 | Energy projectile dealing 14 damage. |
 Charged Shot Charged Shot | M2 | Channeled — deals 24-38 damage scaling with charge time + knockback. |
 Magnetic Orb Magnetic Orb | Space | Launches orb that pulls Destiny to its location + deals 8 AoE damage. |
 Energy Barrier Energy Barrier | Q | Counter — absorbs projectiles and converts them into a charge for next M1. |
 Plasma Wall Plasma Wall | E | Creates a barrier that blocks projectiles and damages enemies passing through. |
 Sky Strike Sky Strike | R | Jumps to target location, dealing 18 AoE damage + Slow on landing. |
 Mega Blast Mega Blast | F | Channeled — massive energy beam dealing 60 damage in a line. |
| EX M2 | EX1 | Enhanced Charged Shot — faster charge + applies debuff. |
| EX E | EX2 | Enhanced Plasma Wall — wider wall + healing to allies behind it. |
Playstyle: Destiny was the zone control specialist. Plasma Wall divided the arena, Charged Shot punished anyone who peeked, and Mega Blast (ultimate) was a devastating beam that could hit multiple targets in a line. Energy Barrier counter converting enemy projectiles into empowered M1 ammo was a creative mechanic that rewarded good timing.
 Ezmo
Ezmo
Role: Ranged | Health: 200 | Theme: Chaos warlock
Core mechanic: Grimoire (Q) — a book that devoured projectiles and spat them back. Displace (Space) — a blink with i-frames.
| Ability | Key | Description |
|---|---|---|
 Arcane Fire Arcane Fire | M1 | Fast projectile dealing 14 damage. High fire rate. |
 Chaos Grip Chaos Grip | M2 | Channeled beam dealing damage over time + pulling enemy slightly toward Ezmo. |
 Displace Displace | Space | Short-range blink dealing 10 damage to enemies at destination. |
 Grimoire Grimoire | Q | Book shield that absorbs projectiles for 1s. Absorbed projectiles fire back at enemies. |
 Shackle Shackle | E | Projectile that roots enemy for 1s + deals 12 damage. |
 Tome of Destruction Tome of Destruction | R | Thrown book that explodes for 24 AoE damage. |
 Chaos Barrage Chaos Barrage | F | Channels rapid-fire chaos bolts dealing 50+ total damage to target area. |
| EX M1 | EX1 | Enhanced Arcane Fire — larger projectile + healing on hit. |
| EX E | EX2 | Enhanced Shackle — longer root + silence. |
Playstyle: Ezmo was the aggressive ranged champion. High M1 fire rate combined with Chaos Grip (M2) pulling enemies in made him a constant pressure threat. Grimoire was unique — not a typical counter but a projectile-eating book that reflected attacks. Ezmo excelled in close-mid range where M1 spam and Chaos Grip created oppressive damage, but lacked long-range poke.
 Iva
Iva
Role: Ranged | Health: 210 | Theme: Mech engineer with guns and gadgets
Core mechanic: Jet Pack (Space) — the primary mobility tool. Tazer (E) stunning enemies. Oil-based combo potential.
| Ability | Key | Description |
|---|---|---|
 Revolver Revolver | M1 | Dual-pistol shots dealing 7 per hit. Very fast fire rate. |
 Rocket X-67 Rocket X-67 | M2 | Launches rocket dealing 20 damage + knockback on impact. |
 Jet Pack Jet Pack | Space | Flies to cursor position, dealing 6 damage to enemies passed over. |
 Zap Zap | Q | Counter — retaliates with electric shock dealing 10 damage + Stun. |
 Tazer Tazer | E | Short-range projectile dealing 8 damage + Stun (0.5s). |
 Oil Barrel Oil Barrel | R | Throws oil barrel creating slick area (-30% movespeed). Can be ignited. |
 Machine Gun Machine Gun | F | Channels a minigun dealing sustained damage in a cone. |
| EX M2 | EX1 | Enhanced Rocket — homing + larger explosion radius. |
| EX Q | EX2 | Enhanced Zap — AoE stun instead of single-target. |
Playstyle: Iva was the sustained damage specialist. Revolver’s rapid fire rate meant constant chip damage, and Rocket X-67 provided burst for orb control. Jet Pack was a reliable escape. Oil Barrel + any fire ability (or ally’s fire) created burning zones for area denial. Iva rewarded consistent aim more than any other ranged champion.
 Jade
Jade
Role: Ranged | Health: 200 | Theme: Sniper/gunslinger
Core mechanic: Snipe (M2) — high-damage charged shot with an audio cue. Stealth (Q) for repositioning. Pure single-target execution.
| Ability | Key | Description |
|---|---|---|
 Revolver Shot Revolver Shot | M1 | Pistol shot dealing 14 damage. |
 Snipe Snipe | M2 | Channeled — 38 damage shot + Stun. Long cast time with audio cue. |
 Blast Vault Blast Vault | Space | Backward leap firing shotgun blast at origin for 16 damage + knockback. |
 Stealth Stealth | Q | Turns invisible for 2.5s + slight movespeed. |
 Disabling Shot Disabling Shot | E | Projectile dealing 12 damage + Silence (2s). |
 Junk Shot Junk Shot | R | Fires spread of pellets dealing 16 damage + Slow + Snare. |
 Explosive Shells Explosive Shells | F | Loads 3 explosive rounds — each M1 fires an explosive dealing 22 damage in AoE. |
| EX M2 | EX1 | Enhanced Snipe — faster charge + applies debuff. |
| EX Q | EX2 | Enhanced Stealth — longer duration + heals during stealth. |
Playstyle: Jade was the one-shot specialist. Stealth → Snipe from an unexpected angle could delete a low-HP target before they could react. The mind-game was constant: is the Jade charging Snipe or fakecasting? Blast Vault leaping backwards (same design as BLC’s Gunner Rocket Jump) was skill-testing and satisfying. Jade demanded precise positioning and timing.
BLC equivalent: Gunner — same sniper/stealth design, same backward leap.
 Jumong
Role: Ranged | Health: 200 | Theme: Hunter with bow
Core mechanic: Prowl (Q) for stealth + empowered attacks. Rain of Arrows (R) for zone control. Steady aim rewarded with burst windows.
| Ability | Key | Description |
|---|---|---|
| M1 | Bow shot dealing 16 damage. | |
| M2 | Channeled — 28 damage arrow + Stun. | |
| Space | Dash backward, fires arrow dealing 12 damage + Slow at origin. | |
 Prowl Prowl | Q | Stealth + movespeed for 2s. Next ability from stealth is empowered. |
 Bear Trap Bear Trap | E | Places trap that roots enemies for 1.5s + deals 14 damage. |
 Rain of Arrows Rain of Arrows | R | AoE arrow rain dealing 24 damage over duration + Slow. |
 Dragon Slayer Dragon Slayer | F | Massive arrow shot dealing 48 damage + piercing through all enemies. |
| EX M1 | EX1 | Enhanced Hunting Arrow — applies Marked (amplified damage). |
| EX E | EX2 | Enhanced Bear Trap — double traps. |
Playstyle: Jumong was the methodical ranged champion. Bear Trap and Rain of Arrows controlled where enemies could stand. Prowl into empowered Steady Shot was the burst combo. Dragon Slayer (ultimate) piercing through the entire enemy team in a line was one of Battlerite’s most satisfying ults. Jumong rewarded setup play and zone control.
 Shen Rao
Role: Ranged | Health: 200 | Theme: Storm dragon/lightning mage
Core mechanic: Lightning strikes and chain damage. Dragon Storm (R) was a powerful AoE storm. Storm-themed abilities with multi-target potential.
| Ability | Key | Description |
|---|---|---|
 Lightning Bolt Lightning Bolt | M1 | Fast projectile dealing 14 damage. |
 Dragon Bolt Dragon Bolt | M2 | Larger projectile dealing 22 damage + knockback. |
 Lightning Strike Lightning Strike | Space | Teleports to target location, dealing 12 AoE damage at destination. |
 Dragon Stance Dragon Stance | Q | Counter — retaliates with lightning blast dealing 12 damage + Stun. |
 Ascension Ascension | E | Rises into the air becoming untargetable, then strikes down for AoE damage. |
 Dragon Storm Dragon Storm | R | Creates a lingering storm at target location dealing damage over time. |
 Cataclysm Cataclysm | F | Calls massive lightning storm dealing 60 AoE damage + Stun. |
| EX M2 | EX1 | Enhanced Dragon Bolt — chains to nearby enemies. |
| EX E | EX2 | Enhanced Ascension — longer air time + healing. |
Playstyle: Shen Rao was one of the last champions added to Battlerite and brought storm-themed AoE damage. Dragon Storm for zone denial and Cataclysm for teamfight-winning AoE made Shen Rao the premier AoE ranged champion. Ascension (E) rising into the air for invulnerability was a unique defensive tool.
 Taya
Taya
Role: Ranged | Health: 210 | Theme: Wind warrior with boomerangs
Core mechanic: Haste (Q) — massive movespeed buff that let Taya attack while moving. Boomerang mechanics from BLC’s Nomad. Constant kiting pressure.
| Ability | Key | Description |
|---|---|---|
 Razor Boomerang Razor Boomerang | M1 | Thrown boomerang, 14 damage. Returns after reaching max range, hitting twice at optimal distance. |
 X-Strike X-Strike | M2 | Two boomerangs in crossing arcs, 10 damage each + Slow on intersection. |
 Wind Strike Wind Strike | Space | Dash forward dealing 12 damage + knockback to enemies in path. |
 Haste Haste | Q | Self-buff: massive movespeed + reduced damage taken. Can attack while moving. |
 Tornado Tornado | E | Lifts target into air for 2s, removing them from combat (invulnerable during). |
 Zephyr Zephyr | R | Ground AoE wind zone dealing 12 damage + Slow to enemies inside. |
 Typhoon Typhoon | F | Creates massive wind vortex pulling enemies in + dealing 40+ damage over duration. |
| EX M1 | EX1 | Enhanced Razor Boomerang — larger + applies Snare. |
| EX Space | EX2 | Enhanced Wind Strike — longer dash + Stun. |
Playstyle: Taya was the kiting queen. Haste letting her attack while moving at high speed made her nearly impossible for melee champions to catch. Razor Boomerangs hitting on both the throw and return created constant projectile density. Tornado removing an enemy from the fight for 2 seconds was game-changing when used on the right target. Taya was the natural counter to melee-heavy compositions.
BLC equivalent: Nomad — same boomerangs, same Haste mechanic, same Tornado.
 Varesh
Role: Ranged | Health: 220 | Theme: Arcane sentinel
Core mechanic: Corruption (from M1) and Inhibitor (from M2) debuffs that amplified damage and reduced enemy output. Consuming stacks triggered bonus effects.
| Ability | Key | Description |
|---|---|---|
 Shatter Shatter | M1 | Arcane bolt dealing 14 damage + applying Corruption (increased damage taken). |
 Hand of Corruption Hand of Corruption | M2 | Dark bolt dealing 12 damage + applying Inhibitor (reduced damage/healing output). |
 Warp Warp | Space | Teleport dealing 8 AoE damage at destination. |
 Inhibitor’s Guard Inhibitor’s Guard | Q | Counter — absorbs next attack, retaliates with AoE Silence. |
 Shatter Zone Shatter Zone | E | Ground AoE dealing damage to enemies inside + consuming debuff stacks for bonus damage. |
 Power of the Void Power of the Void | R | Self-buff granting increased damage + reduced damage taken. |
 Devastation Devastation | F | Channels a massive beam dealing 60 damage in a line + applying Corruption + Inhibitor. |
| EX M1 | EX1 | Enhanced Shatter — heals Varesh + stronger Corruption. |
| EX M2 | EX2 | Enhanced Hand of Corruption — roots target + stronger Inhibitor. |
Playstyle: Varesh was the debuff specialist. Alternating M1 (Corruption) and M2 (Inhibitor) on a target made them take more damage while dealing less. Shatter Zone consuming stacks for burst was the payoff. Varesh was uniquely tanky for a ranged champion — high HP, counter, and Power of the Void self-buff gave genuine survivability. He excelled in extended fights where debuff stacking snowballed.
BLC equivalent: Inhibitor — same Sol/Ohm dual-debuff concept.
The Champions: Support
Supports kept allies alive through healing and utility while contributing offensive pressure. In Battlerite, supports were aggressive — they aimed every heal, dealt meaningful damage, and had to balance offense and defense.
 Blossom
Role: Support | Health: 215 | Theme: Nature fairy
Core mechanic: Thwack (M1) was a melee attack that also healed Blossom. Tree of Life (E) provided sustained area healing. Strong peel tools.
| Ability | Key | Description |
|---|---|---|
 Thwack Thwack | M1 | Melee strike dealing 10 damage + self-heal 6. Unique — support with melee M1. |
 Nourish Nourish | M2 | Healing projectile healing ally for 20 HP + applying Butterflies (HoT). |
 Hop Hop | Space | Short hop, landing knocks back nearby enemies + applies Weaken. |
 Tree of Life Tree of Life | Q | Places a tree that heals nearby allies over time. Tree is destructible. |
 Gust Gust | E | Wind blast dealing 8 damage + knockback. Long range peel. |
 Boom Bloom Boom Bloom | R | Throws a seed that explodes after delay for 20 AoE damage + Stun. |
 Forest Sanctuary Forest Sanctuary | F | Creates massive healing zone that rapidly heals all allies inside. |
| EX M1 | EX1 | Enhanced Thwack — stuns enemy + heals more. |
| EX M2 | EX2 | Enhanced Nourish — larger heal + cleansing debuffs. |
Playstyle: Blossom was the sustained healer. Tree of Life providing passive area healing freed Blossom to play aggressively with Thwack (melee M1). Gust and Hop gave strong peeling tools. Boom Bloom was a delayed stun that rewarded predictive aim. Blossom struggled against compositions that could destroy the Tree quickly, but in sustained fights she outhealed everyone.
 Lucie
Lucie
Role: Support | Health: 200 | Theme: Alchemist with potions
Core mechanic: Barrier (Q) — a massive shield on an ally. Panic Flask (E) — AoE fear. The most defensive support with the strongest single-target healing.
| Ability | Key | Description |
|---|---|---|
 Toxic Bolt Toxic Bolt | M1 | Poison projectile dealing 12 damage + DOT. |
 Healing Potion Healing Potion | M2 | Healing projectile healing ally for 22 HP + Rejuvenate (HoT). |
 Roll Roll | Space | Short dodge roll. No damage, pure escape. |
 Barrier Barrier | Q | Places massive shield on ally absorbing 44 damage. No cooldown — costs energy. |
 Panic Flask Panic Flask | E | Thrown flask dealing 8 damage + Fear (forces running, 1.5s). |
 Clarity Potion Clarity Potion | R | Thrown potion that cleanses ally debuffs + deals damage to enemies. |
 Deadly Injection Deadly Injection | F | Projectile dealing 48 damage + applying DOT that explodes on expiry. |
| EX M1 | EX1 | Enhanced Toxic Bolt — higher damage + stronger DOT. |
| EX M2 | EX2 | Enhanced Healing Potion — much larger heal + damage reduction buff. |
Playstyle: Lucie was the most defensive support. Barrier absorbing 44 damage (no cooldown, just energy cost) meant she could stack shields on focused allies endlessly. Healing Potion was the strongest single-target heal. Panic Flask was devastating area denial. The trade-off: Roll was the weakest escape in the game — a tiny dodge with no invulnerability or utility. Caught without Barrier energy, Lucie was extremely vulnerable.
BLC equivalent: Alchemist — same potion-based healer identity, same barrier being the only escape.
 Oldur
Oldur
Role: Support | Health: 210 | Theme: Time mage
Core mechanic: Chronoflux (R) — a sphere that reversed projectiles. Time Walker (Space) — a teleport that stored position for recall. Time-manipulation theme throughout.
| Ability | Key | Description |
|---|---|---|
 Sands of Time Sands of Time | M1 | Sand bolt dealing 14 damage + applying Sand Struck (reduces healing, stacks). |
 Rejuvenating Sands Rejuvenating Sands | M2 | Healing bolt healing ally for 16 HP + HoT. |
 Time Walker Time Walker | Space | Teleport to target location. Can recast within 3s to return to original position. |
 Shifting Sands Shifting Sands | Q | Counter — absorbs next attack, retaliates with 12 damage + Petrify (brief stun). |
 Quicksand Quicksand | E | AoE that slows and damages enemies standing in it. |
 Chronoflux Chronoflux | R | Sphere that reverses enemy projectiles passing through it. |
 Timelapse Timelapse | F | Rewinds target ally 3 seconds back in time, restoring their health and position. |
| EX M1 | EX1 | Enhanced Sands of Time — bonus damage + stronger debuff. |
| EX M2 | EX2 | Enhanced Rejuvenating Sands — larger heal + movespeed buff. |
Playstyle: Oldur was the utility support. Chronoflux reversing projectiles created powerful zone control. Time Walker’s recall mechanic gave a unique escape — teleport in aggressively, then recall to safety. Timelapse (ultimate) was one of the most impactful ults in the game — rewinding a dying ally 3 seconds restored their health and repositioned them. Oldur rewarded creative play and game sense over raw mechanics.
BLC equivalent: Herald of Insight — same time-manipulation theme, same projectile reflection.
 Pearl
Pearl
Role: Support | Health: 210 | Theme: Ocean mage
Core mechanic: Bubble Barrier (E) — a shield that silenced enemies on break. Dive (Space) — an underwater dash. Water-themed control.
| Ability | Key | Description |
|---|---|---|
 Volatile Water Volatile Water | M1 | Water bolt dealing 14 damage. |
 Healing Wave Healing Wave | M2 | Water wave healing ally for 16 HP + Splash (bounces smaller heals to nearby allies). |
 Dive Dive | Space | Dashes underground (untargetable), emerging at cursor. |
 Counter Splash Counter Splash | Q | Counter — absorbs next attack, retaliates with water splash dealing damage + Silence. |
 Bubble Barrier Bubble Barrier | E | Places bubble shield on ally (absorbs 24 damage). Breaking triggers Silence on attacker. |
 Tidal Wave Tidal Wave | R | Large water wave dealing 16 damage + knockback to all enemies in path. |
 Unstable Bubble Unstable Bubble | F | Launches a bubble that captures an enemy, dealing 40 damage + removing from combat. |
| EX M1 | EX1 | Enhanced Volatile Water — larger shot + Slow. |
| EX Space | EX2 | Enhanced Dive — heals allies near emergence. |
Playstyle: Pearl was the aggressive support. Dive (untargetable dash) was one of the best support escapes. Bubble Barrier silencing the attacker on break punished aggressive enemies. Tidal Wave was excellent peel — knocking back an entire enemy team trying to dive your ally. Pearl excelled in compositions that wanted to play aggressively because Dive let her follow the team forward.
 Pestilus
Role: Support | Health: 210 | Theme: Insect shaman with a swarm
Core mechanic: Queen (R) — a summonable insect companion that attacked enemies and could be detonated. Infest (M2) was a unique heal that also debuffed enemies.
| Ability | Key | Description |
|---|---|---|
 Scarab Shot Scarab Shot | M1 | Insect projectile dealing 12 damage. |
 Infest Infest | M2 | Projectile that heals ally for 16 HP. On enemy hit: damage + Infest debuff (DOT). |
 Moth Flight Moth Flight | Space | Transforms into moth, flying to target location (untargetable). |
 Vomit Vomit | Q | Counter — absorbs attack, retaliates with insect vomit dealing damage + Fear. |
 Scarab Pack Scarab Pack | E | Sends swarm in target direction dealing damage + Panic (forced movement). |
 Queen Queen | R | Summons insect queen that attacks nearby enemies. Can be reactivated to detonate for AoE. |
 Infestation Infestation | F | Creates massive insect swarm zone dealing high AoE damage over time. |
| EX M2 | EX1 | Enhanced Infest — stronger heal + more Infest damage. |
| EX E | EX2 | Enhanced Scarab Pack — wider swarm + Silence. |
Playstyle: Pestilus was the aggressive support who excelled at creating chaos. Queen providing persistent damage pressure while Pestilus healed was unique — no other support had a pet. Moth Flight (untargetable fly) was a strong escape. Vomit counter into Fear was terrifying for melee champions diving Pestilus. The insect theme was deeply committed and mechanically cohesive.
 Poloma
Role: Support | Health: 210 | Theme: Spirit medium
Core mechanic: Soul Bind (E) — linked an enemy, and damage dealt to other enemies was shared to the linked target. Other Side (R) — made an ally invulnerable.
| Ability | Key | Description |
|---|---|---|
 Spirit Bolt Spirit Bolt | M1 | Spirit projectile dealing 12 damage + healing nearest ally for 6 HP (passive). |
 Spirit Guide Spirit Guide | M2 | Healing projectile healing ally for 20 HP. |
 Other Side Other Side | Space | Teleports short distance. On ally: swaps positions with them. |
 Soul Transfer Soul Transfer | Q | Counter — absorbs next attack, teleports Poloma behind attacker. |
 Soul Bind Soul Bind | E | Links target enemy — damage dealt to other enemies is shared to linked target (20%). |
 Pixie Pixie | R | Makes ally invulnerable + immaterial for 1.5s. Ally can still move. Heals nearby allies on expiry. |
 Astral Beam Astral Beam | F | Channels beam dealing 50 damage to first enemy + healing nearest ally. |
| EX M1 | EX1 | Enhanced Spirit Bolt — more damage + stronger passive heal. |
| EX Space | EX2 | Enhanced Other Side — longer range + heals both players on swap. |
Playstyle: Poloma was the aggressive support. M1 passively healing the nearest ally meant Poloma did damage and healed simultaneously — no downtime choosing between offense and defense. Soul Bind spreading damage was devastating in teamfights. Pixie (R) making an ally invulnerable negated enemy burst windows. Soul Transfer counter teleporting behind the attacker was disorienting and repositioned Poloma aggressively.
BLC equivalent: Psychopomp — same spirit healer identity, same soul mechanics.
 Sirius
Role: Support | Health: 215 | Theme: Astronomer/martial artist
Core mechanic: Lunar Strike (M1) was melee — unique for a support. Crescent (charged M2) healed allies in its path. Petrify (E) stunned enemies in stone.
| Ability | Key | Description |
|---|---|---|
 Lunar Strike Lunar Strike | M1 | Melee strikes dealing 10/10/12 damage. Charges a counter. |
 Sunlight Sunlight | M2 | Healing orb healing allies for 18 HP. Channeled for stronger heal. |
 Celestial Split Celestial Split | Space | Dash in target direction dealing 12 damage to enemies + healing allies passed. |
 Counter Counter | Q | Counter — absorbs next attack + deals AoE damage + applies Weaken to attacker. |
 Petrify Petrify | E | Projectile dealing 10 damage + Petrify (1.5s Stun, breaks on damage threshold). |
 Crescent Crescent | R | Charged crescent wave dealing 12 damage to enemies + healing allies in path for 14 HP. |
 Astral Beam Astral Beam | F | Channels beam — heals ally OR damages enemy for 40+ over duration. |
| EX M1 | EX1 | Enhanced Lunar Strike — applies Weaken + self-heal. |
| EX E | EX2 | Enhanced Petrify — larger AoE + longer stun. |
Playstyle: Sirius was the melee support — the most aggressive healer in Battlerite. Lunar Strike M1 meant Sirius was in the thick of combat, not backline hiding. Counter rewarded enemies who tried to focus Sirius. Petrify was one of the best CC abilities in the game — a reliable stun that set up kills. Crescent healing allies while damaging enemies in the same wave was efficient and satisfying. Sirius demanded aggressive positioning but rewarded it with exceptional output.
BLC equivalent: Near-identical to Astronomer — the closest 1:1 port from BLC to Battlerite.
 Ulric
Ulric
Role: Support | Health: 220 | Theme: Holy paladin
Core mechanic: Smite (M1) melee attacks that dealt damage and healed allies. Radiance (R) was an AoE heal + damage buff. Shield-heavy defensive support.
| Ability | Key | Description |
|---|---|---|
 Smite Smite | M1 | Mace strike dealing 10 damage + healing nearest ally for 8 HP. |
 Holy Light Holy Light | M2 | Healing beam healing ally for 16 HP per tick. Channeled. |
 Intervene Intervene | Space | Dash to cursor + shield nearest ally for 14 absorption. |
 Aegis Aegis | Q | Counter — absorbs next attack, grants AoE shield to nearby allies. |
 Hammer of Justice Hammer of Justice | E | Thrown hammer dealing 14 damage + Stun (0.75s). |
 Radiance Radiance | R | AoE burst: heals allies for 18 + deals 12 damage to enemies + grants damage buff. |
 Divine Light Divine Light | F | Channels massive healing beam — rapidly heals ally + grants damage immunity briefly. |
| EX M1 | EX1 | Enhanced Smite — AoE swing + larger heal. |
| EX Space | EX2 | Enhanced Intervene — larger shield + knockback at destination. |
Playstyle: Ulric was the defensive support anchor. Smite passively healing allies (like Poloma’s M1 but melee) kept the team healthy while Ulric contributed damage. Aegis counter shielding nearby allies was uniquely team-focused. Radiance was the teamfight button — healing everyone, damaging enemies, and buffing ally damage in one AoE. Ulric thrived in deathball compositions that stuck together.
 Zander
Role: Support | Health: 210 | Theme: Stage magician
Core mechanic: Portal (Space) — placed two portals that allies could travel through. Grand Conjuration (R) — created an illusion clone. Unique map control through teleportation.
| Ability | Key | Description |
|---|---|---|
 Trick Shot Trick Shot | M1 | Card projectile dealing 14 damage. |
 Healing Card Healing Card | M2 | Thrown card healing ally for 18 HP + Inspire (damage buff). |
 Portal Portal | Space | Places two portals. Allies (and Zander) can travel between them. |
 Mirror Image Mirror Image | Q | Counter — creates mirror image at Zander’s location while teleporting away. |
 Sheep Trick Sheep Trick | E | Projectile that polymorphs enemy into a sheep for 2s (silenced + slowed). |
 Grand Conjuration Grand Conjuration | R | Creates illusion clone that mimics Zander’s abilities at reduced effectiveness. |
 The Show Must Go On The Show Must Go On | F | Creates an arena-wide spectacle — deals damage to all enemies + heals all allies. |
| EX M1 | EX1 | Enhanced Trick Shot — larger card + applies debuff. |
| EX M2 | EX2 | Enhanced Healing Card — larger heal + movespeed buff. |
Playstyle: Zander was the trickster support. Portal fundamentally changed how the team moved — creating cross-arena shortcuts that enabled aggressive dives and instant retreats. Sheep Trick (polymorph) was one of the strongest CC abilities in Battlerite, completely disabling a target for 2 seconds. Grand Conjuration clone added confusion and extra damage. Zander had the highest skill ceiling among supports and rewarded creative, unpredictable play.
Competitive Scene
Battlerite’s competitive scene was centered around the Battlerekt tournament series and community-organized events.
Battlerekt Series
The Battlerekt tournaments were the premier competitive Battlerite events, organized by the community with Stunlock’s support. The format was typically 3v3 (the competitive standard) with European and North American divisions.
DreamHack Events
Battlerite appeared at DreamHack tournaments, continuing the BLC competitive tradition at the same Swedish venue. These events drew the top teams and offered the largest prize pools in the scene.
Notable Competitive Teams and Players
The Battlerite competitive community was international, with strong scenes in:
- Europe: Swedish, Finnish, and mixed-EU teams dominated early
- North America: Strong but smaller scene
- Asia: Korean teams participated in international events
Many top BLC players transitioned directly to Battlerite and immediately competed at the highest level, their BLC mechanical skills translating directly.
Why the Scene Declined
The competitive scene mirrored the game’s population decline. As the player count dropped (from 44,000+ peak to sub-1,000 concurrent by 2019), tournament participation fell. Stunlock’s pivot to Battlerite Royale in 2018 — a battle royale mode that split development resources — was widely criticized by the competitive community as abandoning the core 3v3 experience.
BLC to Battlerite: The Full Mapping
| BLC Bloodline | Battlerite Champion | Similarity |
|---|---|---|
| Astronomer | Sirius | Near-identical (closest 1:1 port) |
| Igniter | Ashka | Direct successor, series mascot |
| Ranid Assassin | Croak | Direct descendant — same frog |
| Psychopomp | Poloma | Same spirit healer identity |
| Herald of Insight | Oldur | Time manipulation theme |
| Glutton | Rook | Earth brawler identity |
| Gunner | Jade | Sniper/stealth/backward leap |
| Nomad | Taya | Boomerangs + Haste + Tornado |
| Inhibitor | Varesh | Dual-debuff system |
| Thorn | Thorn | Same name, plant tank |
| Vanguard | Bakko | Shield warrior + projectile reflection |
| Spear Master | Shifu | Spear + Kunju counter + in-and-out |
| Harbinger | Ruh Kaan | Dark lifesteal + ranged pull |
| Alchemist | Lucie | Potion healer + barrier escape |
| Stalker | Croak (partial) | Stealth assassin elements |
Champions without direct BLC equivalents — Blossom, Destiny, Ezmo, Freya, Iva, Jamila, Jumong, Pearl, Pestilus, Raigon, Shen Rao, Ulric, Zander — were original Battlerite designs, though many incorporated design elements from multiple BLC bloodlines.

Why This Matters
Battlerite was the closest any game has come to perfecting the arena brawler formula. The combat was tight, the champions were well-designed, and the Battlerite system solved BLC’s loadout problem elegantly. It failed not because the game was bad, but because sustaining a niche PVP community is one of the hardest problems in game design.
The 27 champions in this guide represent some of the best character design work in competitive PVP history. Each had a distinct identity, a clear skill expression pattern, and mechanical depth that rewarded hundreds of hours of practice. The counter mind-game, inherited from BLC and refined in Battlerite, is still the deepest PVP interaction pattern outside of fighting games.
Preserving the Legacy: Battlerite’s servers are gone. You cannot download it. You cannot play it. But the design work — 27 champions, each with 9 abilities, each balanced against every other through thousands of competitive matches — that work deserves to survive. This guide exists so that the next team building an arena brawler doesn’t have to start from zero. The answers are here. The blueprint was proven. Someone just needs to finish what Stunlock started.
If you’re interested in the games carrying this torch forward, see Indie PVP Games You Should Know About. The arena brawler genre isn’t dead — it’s waiting for the right team to learn from BLC and Battlerite’s lessons and build the game that finally breaks through.
This guide was compiled from the Battlerite Fandom Wiki, Steam community resources, competitive scene archives, and the author’s extensive time with the game. Some damage values may vary from final patch numbers. Champion abilities described reflect the game’s final state before shutdown.


Discussion